This post may contain affiliate links.
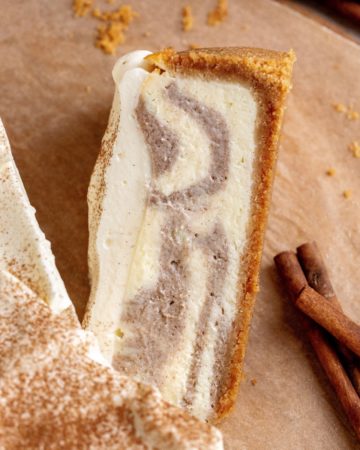
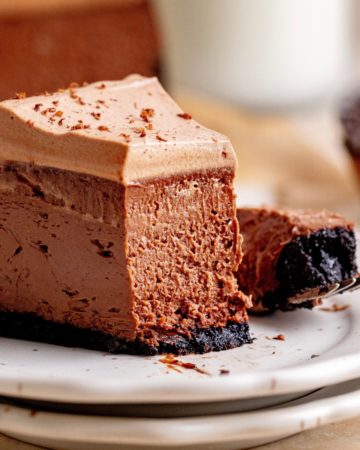
If you love Tiramisu and cheesecake, then look no further than this delicious Tiramisu Cheesecake! A luscious treat that marries the delicious flavors of a cocoa cookie crust, velvety no-bake mascarpone cheesecake and a layer of coffee soaked lady fingers. It is topped with whipped cream and a lots of cocoa powder. This dessert is a must-try for all Tiramisu lovers.

In this delicious Tiramisu Cheesecake, a cacao cookie crust lays the foundation for a smooth and creamy mascarpone cheesecake filling with a layer of coffee soaked lady fingers! This cheesecake marries all of the flavours of a classic Tiramisu and a no-bake cheesecake. It is topped with whipped cream and lots of cocoa powder, taking it to another level of goodness.
For more cheesecake recipes, try Lemon Meringue Cheesecake, Apple Crumble Cheesecake and Biscoff Cheesecake.
Jump to:
WHY THIS RECIPE WORKS
- Cacao cookie crust: The cheesecake sits perfectly on top of a cacao cookie crust.
- No-bake cheesecake filling: This Tiramisu cheesecake is so easy to make. It's a no-bake cheesecake making it so quick and easy. The hardest part is waiting to be able to eat it!
- Lady fingers (Savoiardi): The lady fingers are dipped in coffee and gives a perfect surprise in the middle of the cheesecake.

INGREDIENT NOTES
These are some of the key ingredients for this recipe. For a full list of ingredients, check out the recipe card below.
- Cream cheese: It's important that it's full-fat cream cheese. Use it straight out of the fridge.
- Heavy cream: The heavy cream is whipped up to a very stiff peak but be careful not to whip it into butter. It'll take about 2-3 minutes on medium/high speed.
- Cocoa powder: You can't have a Tiramisu without a dusting of cocoa powder on top for a delicious chocolate flavor. I recommend using a high quality dutch process cocoa powder for the best flavor, my favorite is from Valrhona or Ghirardelli.
- Mascarpone: Mascarpone is big part of a classic tiramisu. It gives the most smooth and delicious flavor.
- Vanilla paste: I recommend using pure vanilla paste for the best flavor.
STEP BY STEP INSTRUCTIONS - COOKIE CRUST
Here is how to make this Tiramisu Cheesecake. This recipe needs a stand mixer or electric mixer.
The full recipe is down below in the recipe card.
Prepare a 23 cm / 9-inch springform pan lined with parchment paper in the bottom.
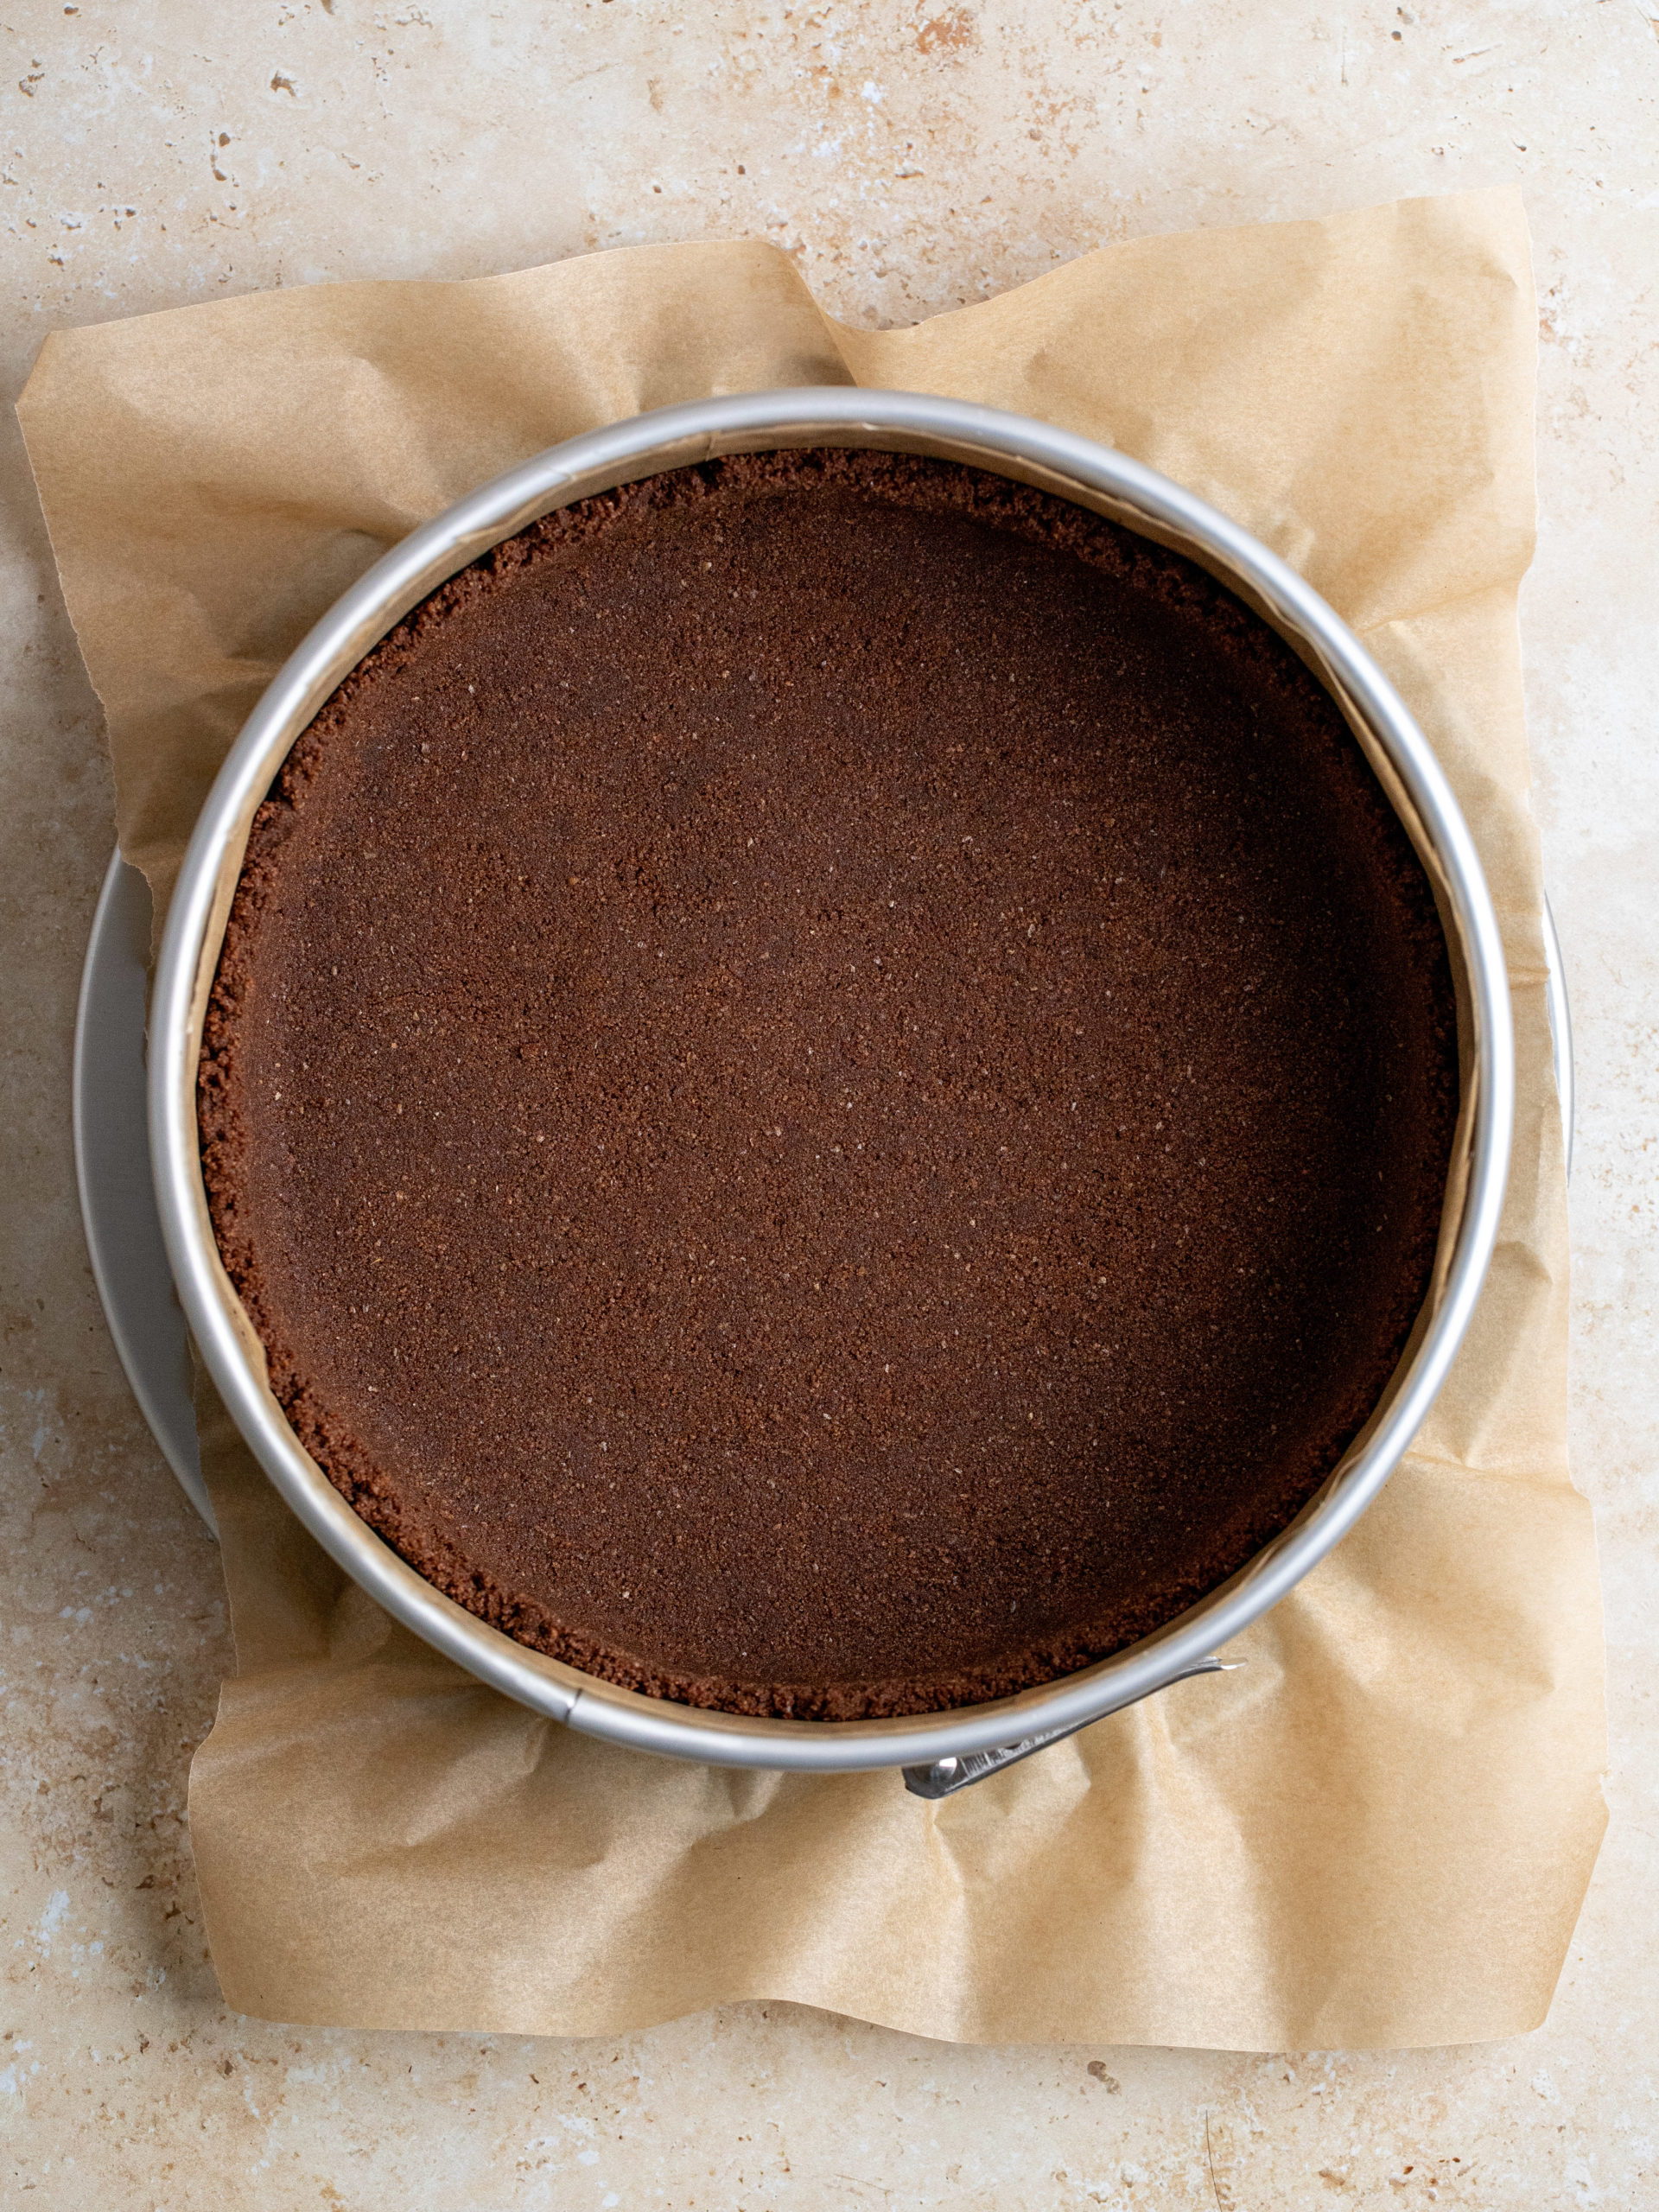
STEP 1: In a food processor, blend the graham cracker or digestive cookies and cocoa powder until fine crumbs. Melt the butter and blend it together with the blended cookies.
STEP 2: Add the cookie crumbs to the springform and press the cookie crust down in the bottom of a 9-inch springform, with the bottom of a glass, so it’s well packed together and flattened out. Place it in the fridge while preparing the cheesecake filling.

STEP BY STEP INSTRUCTIONS - FILLING
STEP 1: With a hand mixer or in a stand mix using the paddle attachment, cream the cream cheese. Add the mascarpone, powdered sugar and vanilla and mix until smooth. Add the heavy cream and whisk it until it can hold a stiff peak.
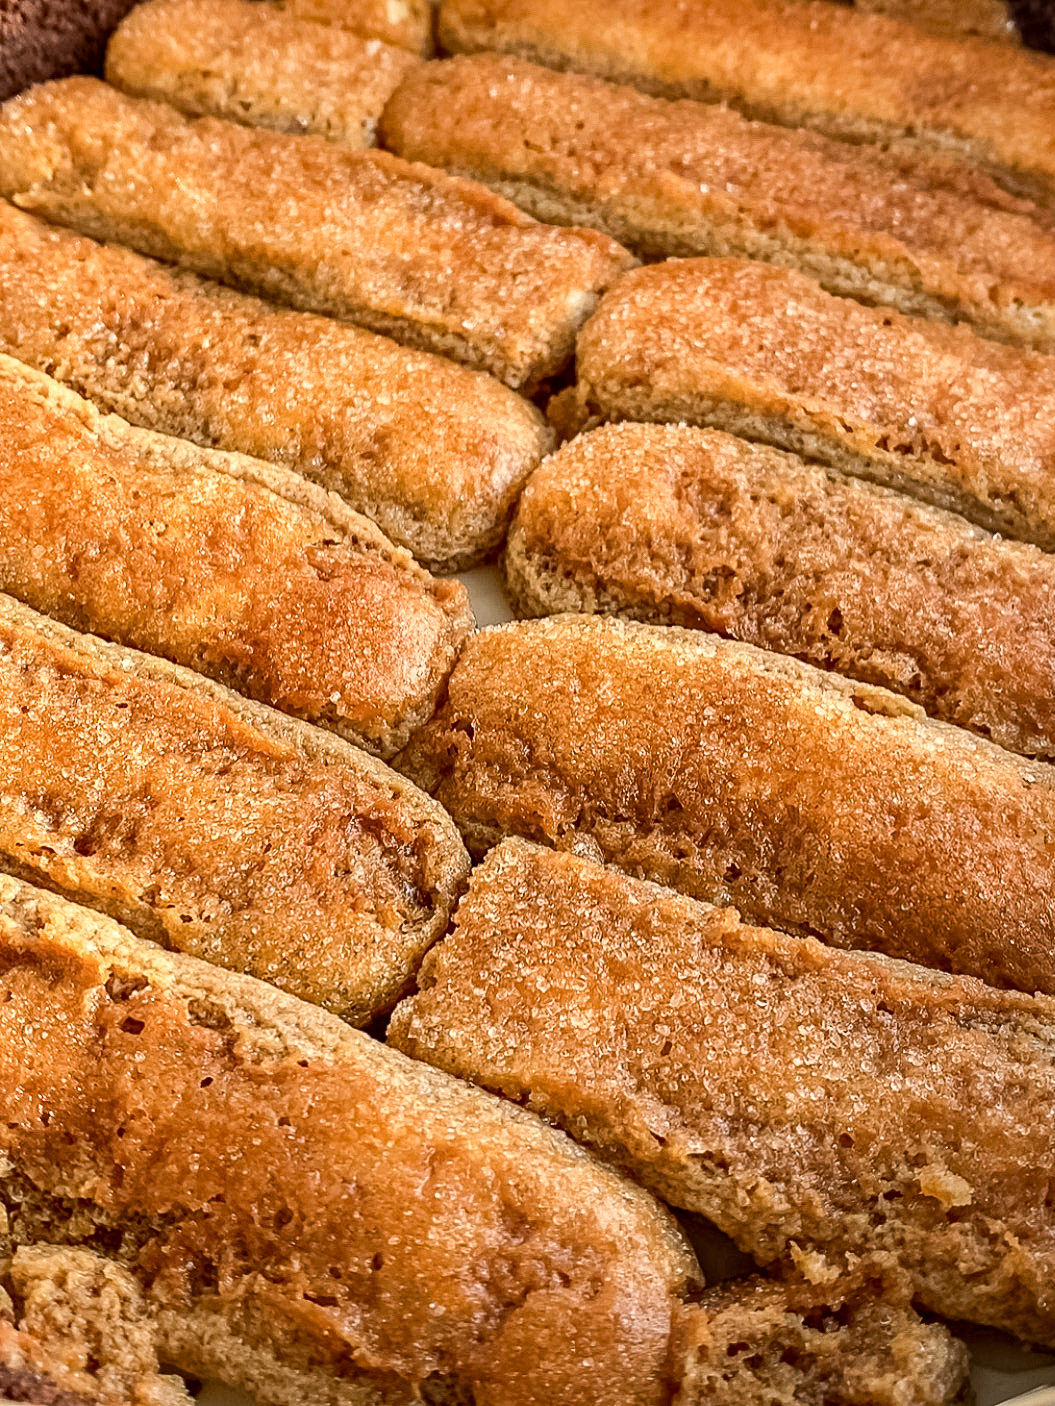
STEP 2: Add half of the cheesecake filling into the spring pan and with an off-set spatula or rubber spatula even out the cheesecake filling. Dip the lady fingers into the coffee once on each side.
STEP 3: Lay the lady fingers in straight lines. You’ll have to cut the lady fingers to fit the cheesecake. Then add the other half of the cheesecake filling and with an offset spatula even it out. Cover the spring pan with cling film and place it in the fridge for a minimum of 8 hours.
STEP 4: Move the cheesecake to a serving dish. Whip up the heavy and add it on top of the cheesecake. Place it back in the fridge and once ready to serve, dust it with cocoa powder.


EXPERT BAKING TIPS
- Use a kitchen scale: My default setting for my recipes is grams. It is the most precise way of measuring out your ingredients, I therefore highly recommend using a kitchen scale.
- Don't over mix your batter: I always use a spatula after everything has mixed together, to give it one final gentle fold together. This makes sure everything in the bottom of the mixing bowl has been mixed into the batter.
- Light vs. dark baking pans: For the best result, use an aluminum baking pan, greased with butter and lined with baking paper in the bottom. Aluminum pans are light in color and therefore attract less heat. That means it bakes more gently which results in a softer cake. If you use a black baking pan it'll attract a lot more heat. That will then give a darker crust, which can result in a dryer cake.

FAQ
When it can hold a stiff peak.
Yes, covered by cling film you can store it up to 3 days in the fridge.
STORAGE
Store the Tiramisu Cheesecake wrapped with plastic wrap or in an airtight container in the fridge. You can store it in the fridge for up to 3-4 days.

Other Cheesecake Recipes To Try
Make sure leave a STAR REVIEW if you loved this recipe! Make sure to tag me on Instagram @juliemarieeats. To get more ideas by following me on Pinterest.

Tiramisu Cheesecake
Equipment
Ingredients
COOKIE CRUST
- 250 g graham cookies or Digestives cookies
- 2 tablespoon dutch processed unsweetened cocoa powder
- 75 g butter
CHEESECAKE FILLING
- 250 ml strong black coffee
- 1 tablespoon Amaretto optional
- 600 g cream cheese
- 165 g mascarpone cheese
- 150 g powdered sugar
- 1 ½ teaspoon vanilla paste
- 360 g heavy cream (380 ml)
- ½ a pack of lady fingers
TOPPING
- 230 g heavy cream (250 ml)
- 2 tablespoon powdered sugar
- ½ teaspoon vanilla paste
- dutch processed unsweetened cocoa powder for dusting
The US customary cup measurement serves as a rough estimate, as it can have uncertainties, so for precise results, it's recommended to weigh your ingredients using a digital scale in grams. Baking is both an art and a science, which most often requires precision and accuracy.
Instructions
COOKIE CRUST
- Start by brewing the coffee for the ladyfingers. Pour it into a shallow bowl and optionally mix in Amaretto. While preparing the cheesecake let it cool down on the kitchen counter.250 ml strong black coffee, 1 tablespoon Amaretto
- In a food processor, blend the graham cracker or digestive cookies and cocoa powder until a fine sand-like texture. Melt the butter. Add the melted butter to the food processor and blend it together with the blended cookies.250 g graham cookies or Digestives cookies, 2 tablespoon dutch processed unsweetened cocoa powder, 75 g butter
- In a 23 cm/ 9-inch springform add parchment paper. Add the cookie crumbs and press the cookie crust down with the bottom of a glass, so it’s well packed together and flattened out. Place it in the refrigerator while preparing the cheesecake filling.
CHEESECAKE FILLING
- With a hand mixer or in a stand mix using the paddle attachment, cream the cream cheese for 1 minute on low speed.600 g cream cheese
- Add the mascarpone, powdered sugar and vanilla paste and mix on medium/high speed until smooth, about 1 minute. Scrape down the sides of the bowl and at low speed let it mix until everything is combined, about 30 seconds.165 g mascarpone cheese, 150 g powdered sugar, 1 ½ teaspoon vanilla paste
- Scrape down the bowl again and add the heavy cream and whisk it until it can hold a stiff peak.360 g heavy cream
- Add half of the cheesecake filling into the springfom and with an off-set spatula even out the cheesecake filling.
- Dip the lady fingers into the coffee once on each side. If they are coated more than once, the lady fingers will hold too much coffee and there is a chance that coffee can leak out from the cheesecake when it’s resting in the fridge.½ a pack of lady fingers
- Lay the lady fingers in straight lines. You’ll have to cut the lady fingers to fit the cheesecake (see the photo above in the blog post). Then add the other half of the cheesecake filling and with an off-set spatula even it out. Cover the springform with cling film and place it in the refrigerator for a minimum of 8 hours.
DECORATION
- Move the cheesecake to a serving dish. Whip together heavy cream, powdered sugar and vanilla paste until stiff peaks. Add it on top of the cheesecake and place it back in the refrigerator. Once ready to serve, dust it with cocoa powder.230 g heavy cream, 2 tablespoon powdered sugar, ½ teaspoon vanilla paste, dutch processed unsweetened cocoa powder
- TIP: For clean slices, place a sharp knife under hot water, dry it off and cut into the cheesecake. Do so after each slice.


Ashley
This cheesecake recipe has been a huge hit whenever I've made it. People request it and look forward to it!
Anh
Amazing, delicious, and tasty. The effort is worth it. Make sure to keep whipping until stiff peaks, or else the cheese part of the cheesecake might be too soft.
Myrthe
My dad wanted this cake again after I baked him this last year for his birthday! So delicious!!!
Sarah
Made almost exactly to recipe, besides I used vanilla extract instead of paste and I made my ladyfingers from scratch. Turned out perfect! My husband loves tiramisu and he said it tasted just like it!
Andrea Vargas
Love it! I keep making it every year for my birthday
geby
good good good good good good good good good good good good good good good good good good good good good good good good good good good good good good good good good good good good good good good good good good good good good good good good good good good good good good good good good good good good good good good good good good good good good good good good good good good good good
Monique Auffrey
AMAZING
Elida Zanon
Hello Julie. Recipe looks very delicious!
Can't wait to make it tomorrow. Thanx.
Julie Marie
I cannot wait to make this recipe Julie. I live coffee and i am also a 'Julie Marie' so I know this recipe must be amazing! Cheers
Diane Page
And you dont have to bake it... yay😜since l dont have ann oven big enough to bake in ... in my trailer... going to florida for three months.... need simple desserts. Thank you so much for sharing
Andrea Hay
I've just made this for my husband's birthday. His two favourite desserts are tiramisu and cheesecake and this is a great combination of both